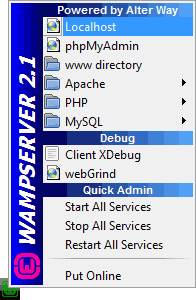
Hopefully, you have now downloaded and installed Wampserver. This will give
you a server on your own PC (Windows users), somewhere you can test your scripts.
If you haven’t yet dowloaded the Wampserver software, you can download it here:
If the installation went well, you should have an new icon in the bottom right,
where the clock is:

Click the icon to see the menu above (older versions of Wampserver).
In Windows 10, double-click the Wampserver desktop icon after installation.
You’ll then see a green square on your taskbar, where the clock is. If you can’t
see the green square, click the white arrow to see it:
The image below shows Wampserver 3.0.6 running on a Windows 10 64bit machine:
From here, you can stop the server, exit it, view help files, and see the configuration
pages.
Click on localhost, though, and you’ll see this page appear: (Localhost
just refers to the server running on your own computer. Another way to refer
to your server is by using the IP address 127.0.0.1.)
Click the link under Tools that says phpinfo(). If all went well,
you should be looking at the following page (The one below is a different php
version, but don’t worry about this – as long as you see something):
(click to open in a new window 66K)
If you saw the above page, then congratulations! Your PHP server is up and
running, and you can make a start scripting PHP pages.
Troubleshooting
If you don’t see the info.php page, then you will need to refer to the wampserver
forums. The page you need is here:
Hopefully, your question will already have been asked an answered. (Unfortunately,
we can’t answer questions about Wampserver, as it’s not our software.)
The WWW folder
If you look at the menu again, you’ll see there’s another item called www directory:
This is the folder where you store and save all your files when working through this course. It’s the equivalent of the public_html folder if you’ve bought some web space. (You can just drag and drop files from the www directory on your computer to the public_html on your web space.)
But click on www directory and you should see an Explorer window open. The address to this directory is:
C:wamp64www
(In future, if you want to see all your files, you can navigate to this address using an Explorer window.)
If you were to save a file called variables.php inside of www then, to test it out, you’d type the following inside a browser window:
localhost/variables.php
So the localhost/ maps to the www folder. But you don’t type www. Just type localhost/ instead then add whatever file you’re trying to test.
You can create folders inside of the www folder. For example, suppose you created a folder inside of www called variables_folder. You then placed the variables.php file inside of this new folder. To test it, you’d type the following:
localhost/variables_folder/variables.
So it’s localhost/FOLDER_NAME/FILE_NAME
To sum up: save all your files to the www folder. To test your code, type localhost/ instead of www.
|
Kaynak : https://www.homeandlearn.co.uk/php/php1p3.html ‘sitesinden alıntı


