In this set of tutorials, you will learn how to write a survey app in PHP.
To get started, you need the survey folder, which is in the scripts folder that
you downloaded. Copy the survey folder over
to the www directory on your PHP server. (Wampserver users can click on the
green icon in the bottom right of Windows. From the menu that appears, click
www directory to open the folder.)
You’ll also need the database, which can be found in the databases folder,
and is called survey.sql. Load up phphMyAdmin and import this SQL file,
just like you did for the membertest and login databases in previous
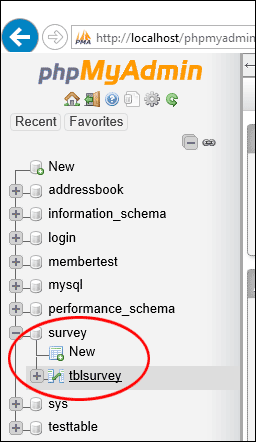
sections. When you import the survey file, the left side of phpMyAdmin should
look like this:

So the database is called survey and the table in the database is called
tblsurvey.
Click on tblsurvey. This will take you to the browse tab in phpMyAdmin,
where you can see three rows already set up:

Each row is a question from our survey.
Click on the Structure tab at the top. You’ll see this (we’ve chopped
a few columns off from the right-hand side):

In the Name column on the left, we have our table fields. There are eight in
all: ID, Question, OptionA, OptionB, OptionC, VotedA, VotedB, VotedC. OptionA,
OptionB and OptionC are where the three choices go when you set a new question.
These three all have the Type varchar, and can be 255 characters in length.
VotedA, VotedB and VotedC are all integer types. These three fields will get
incremented in the PHP code, depending on which choice the user voted for. They
have all been set to a default value of 1, rather than leaving then all on the
default of 0. This is so that we don’t get any divide by zero errors in our
“View Results” page.
Click back on the Browse tab at the top, though.
You can, if you want, edit the values in the table. For example, the choice
for OptionA in the “Do you like Facebook?” question says “yes,
it’s brilliant!”. We’d like the “yes” to have a capital letter
Y at the start. To edit just this row, put a check in the box to the left of
Edit:

Now click on Edit. You will be taken to the Insert page. Amend
the OptionA text area. Change the lowercase y to and uppercase letter:

Now click the GO button in the bottom right. (You may need to scroll down to
see it). You will be taken back to your Browse tab. You should now see the amendment:

In the image above, the y of “Yes” is now a capital letter.
Ok, let’s get started with the code, and you’ll see how it all works. But remember
those table fields, and their data types, as we’ll be needing to use them to
construct the SQL for our prepared statements.
The next thing we’ll do is to take a look at how the app works.
Kaynak : https://www.homeandlearn.co.uk/php/php15p1.html ‘sitesinden alıntı
